- Details
- Published on Wednesday, 23 November 2016 16:48
Getting started is always the hardest part. Whether you are new to the program or just need a refresher, click on the titles below for guidance about how to get the most out of your PlantingScience experience!
Applying for a session
Step 1: Select a session
PlantingScience sessions are held each Fall and Spring, and run for about twelve weeks. Typically, the schedule runs as follows:
| Session | Session Starts | Session Ends | Application Opens | Early Bird | Deadline |
|---|---|---|---|---|---|
| Fall | 2nd Monday in September |
November 30th | May 15th | July 15th | August 15th |
| Spring | 2nd Monday in February |
April 30th | October 15th | December 15th | January 15th |
Prior to the Early Bird date, placement preference is given to returning teachers. After the Early Bird date, applications are accepted on a first-come, first-served basis until all available slots are filled.
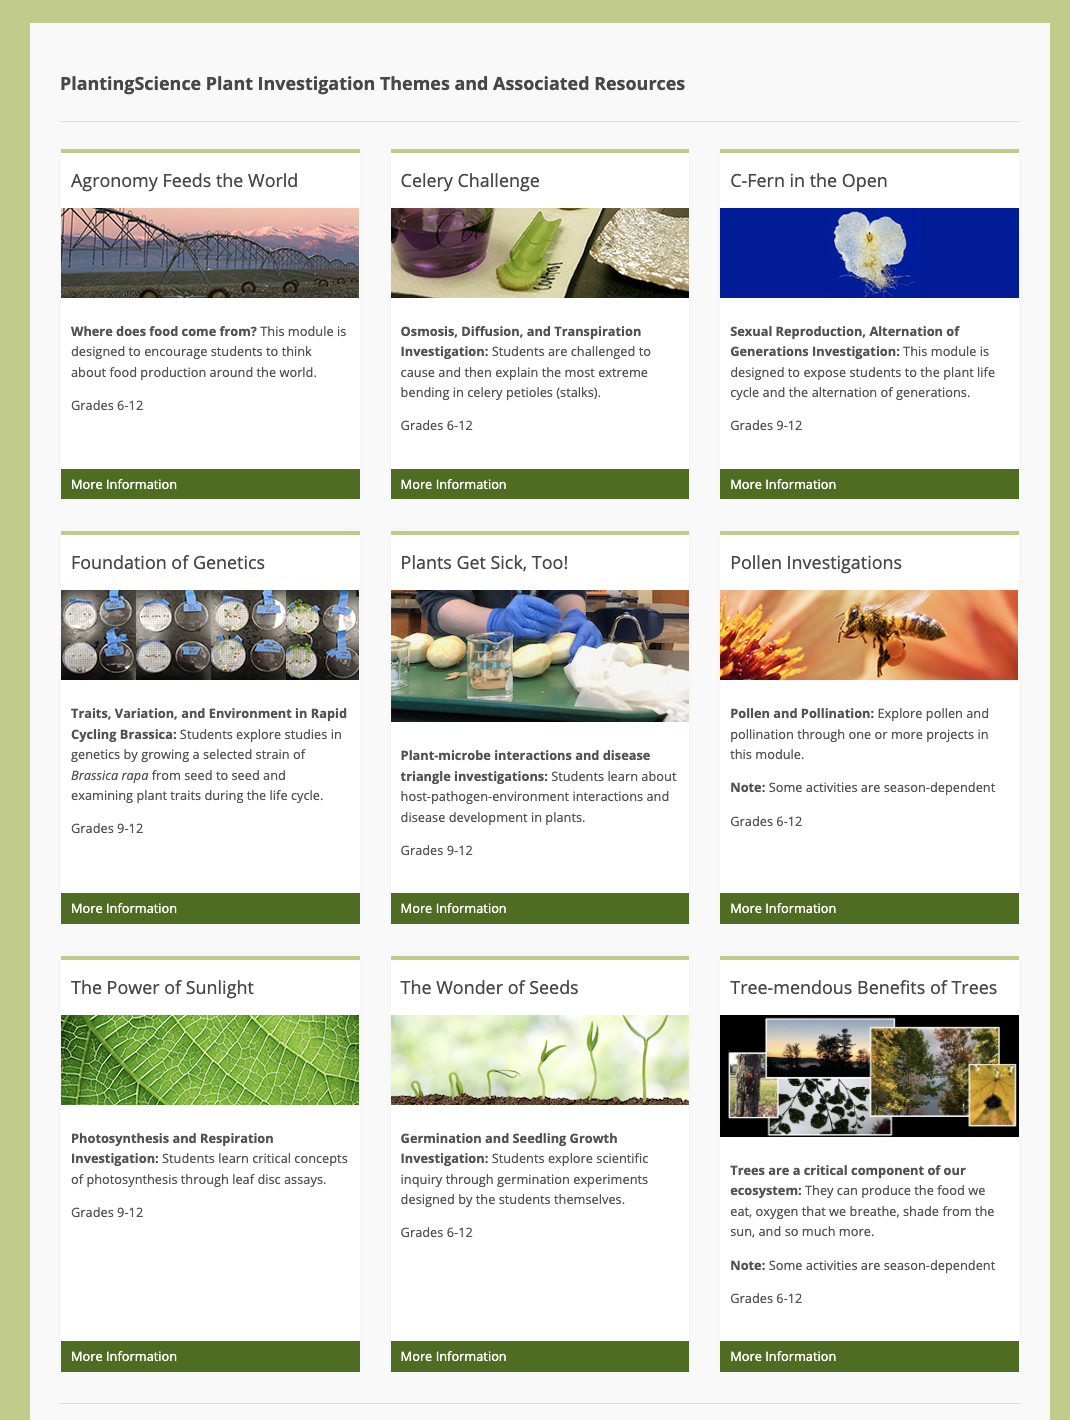 Step 2: Browse the Investigation Themes
Investigation Themes can serve as standalone units or can be used as supplements to your existing curriculum.
Each theme includes guidance for whole group activities followed by open inquiry investigation opportunities during which students design and carry out investigations while communicating with their scientist mentors online.
Nine themes are currently available, all of which address content and science practices that support performance expectations outlined in the Next Generation Science Standards. All materials are available free to download and use regardless of whether you plan to participate in student mentoring.
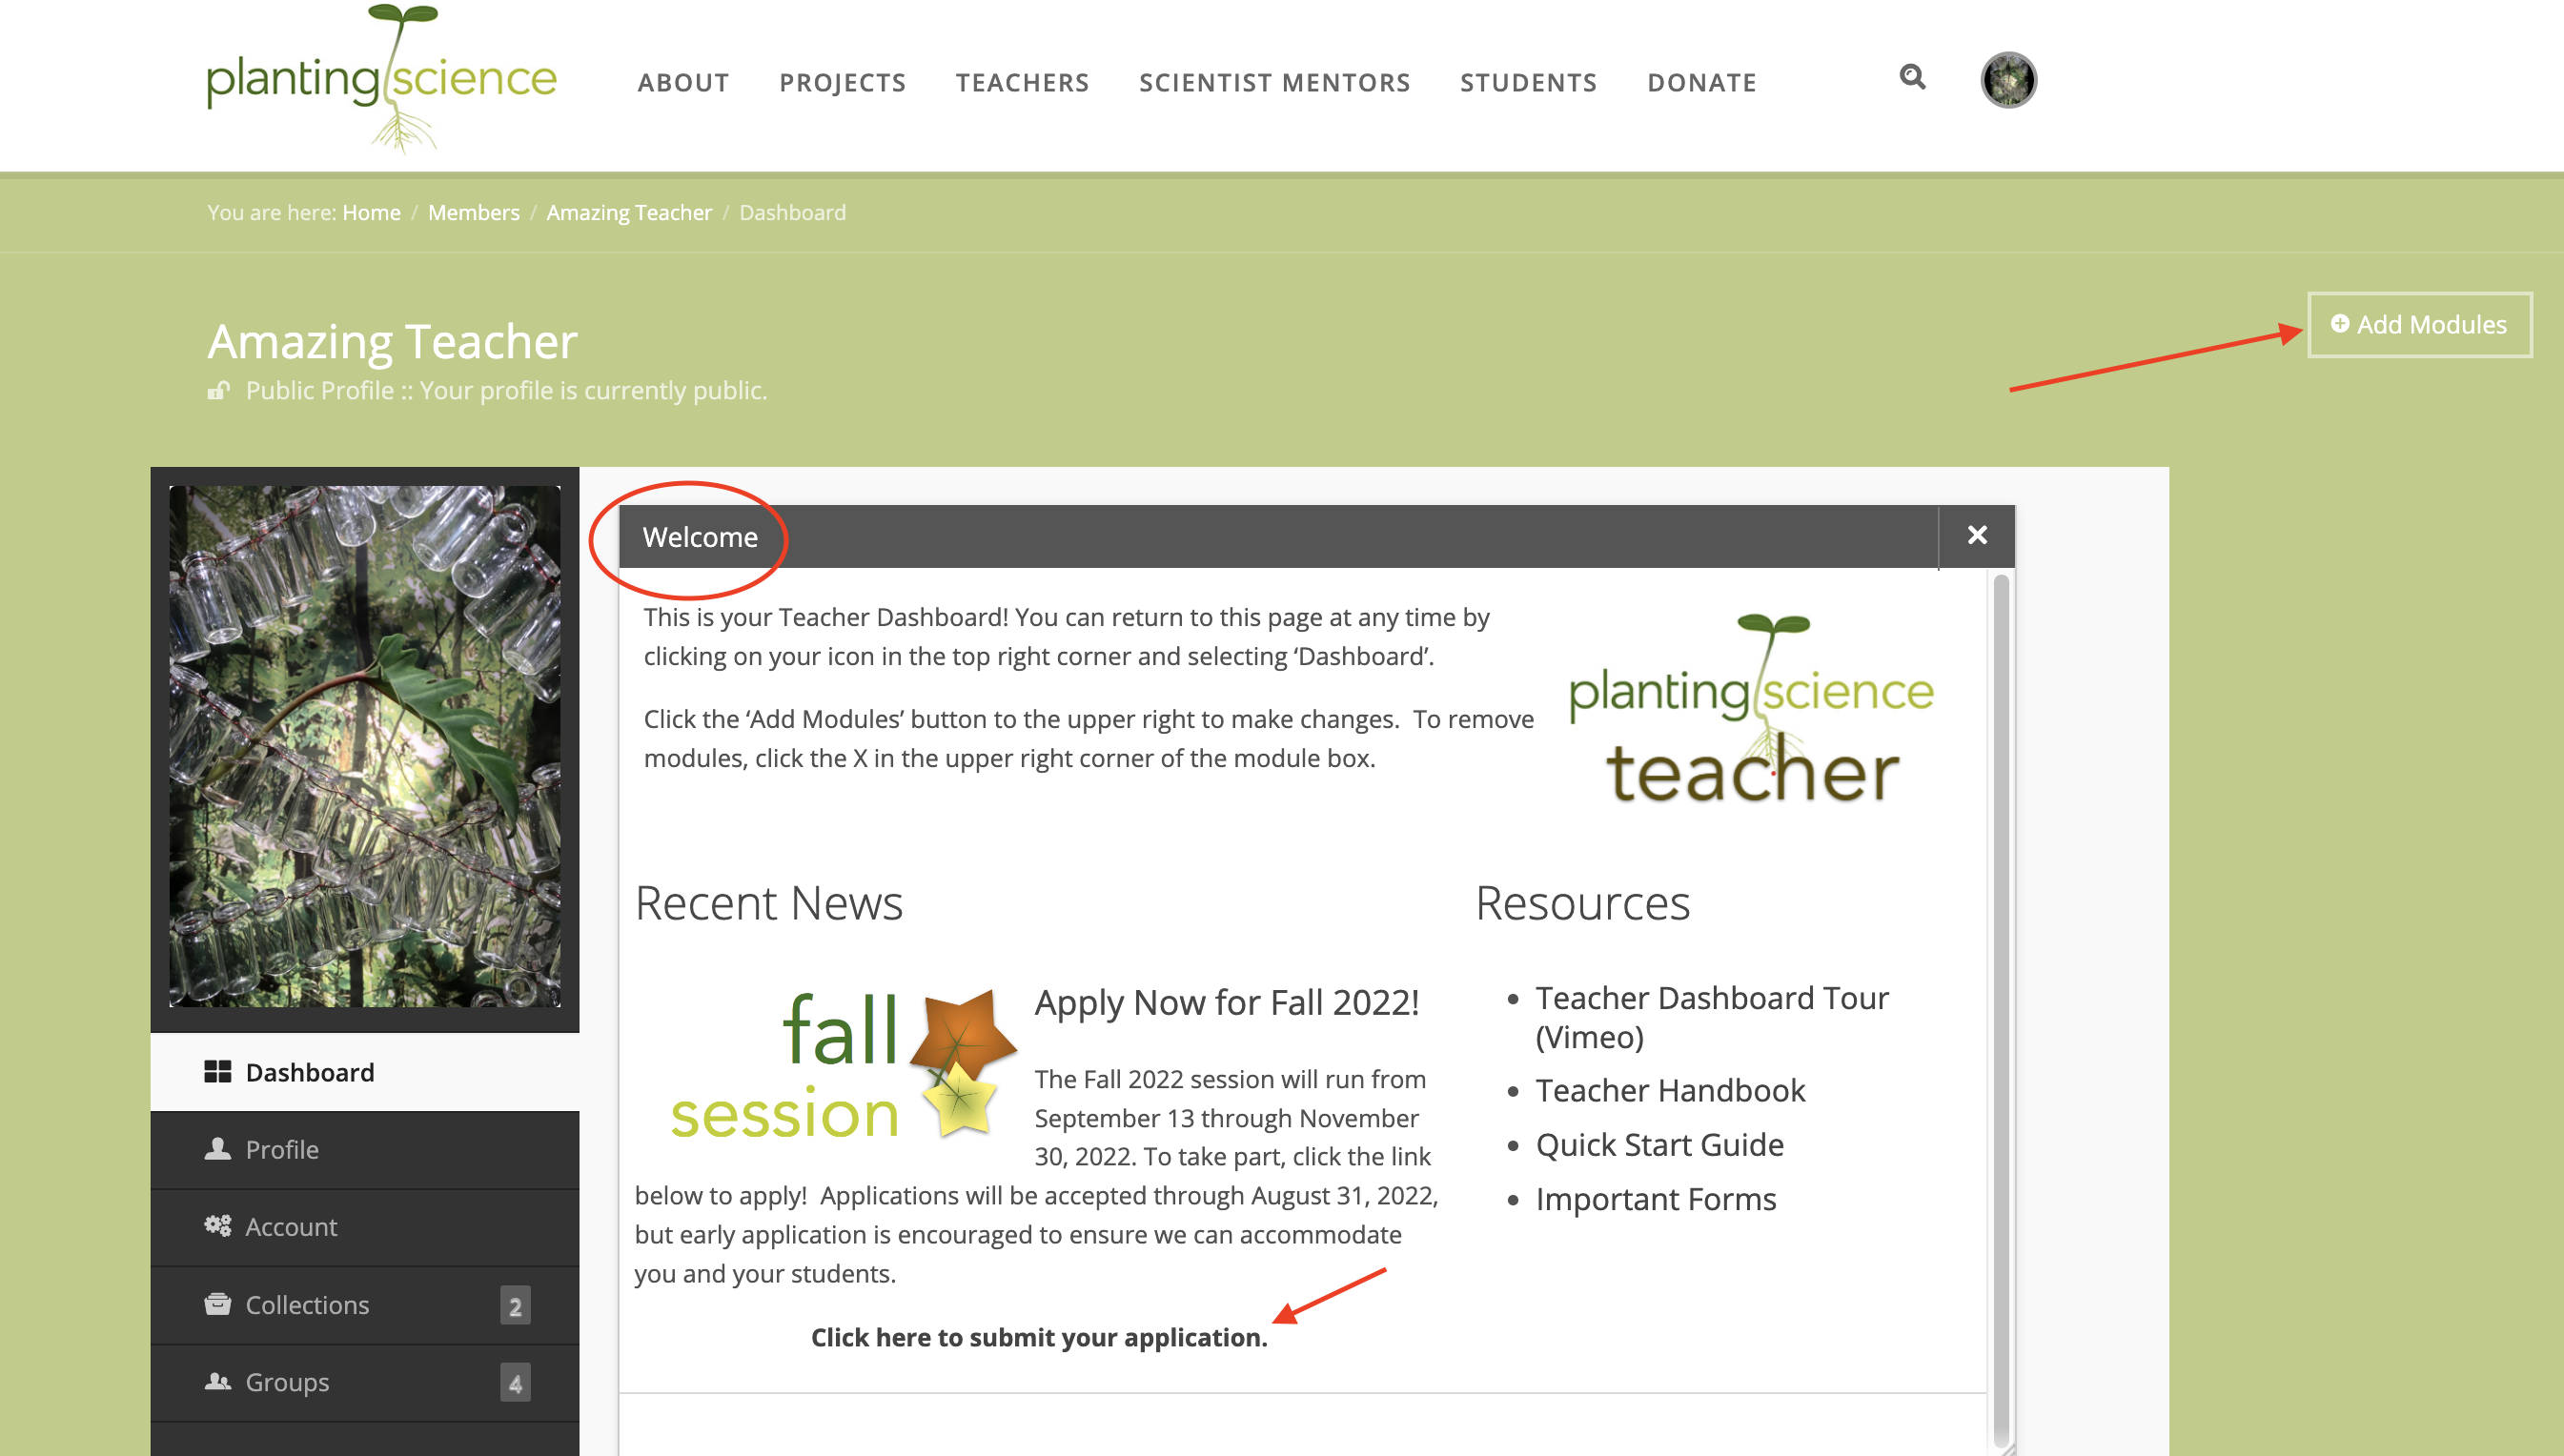 Step 3: Submit an application
To submit your application, simply log into your PlantingScience.org account and look for the 'Welcome' module on your account dashboard. You can reach your account dashboard by clicking on your account icon in the upper right-hand corner of the screen and selecting 'Dashboard' from the menu that appears.
(If you don't see a Welcome module similar to the one shown below, click the 'Add Modules' button in the upper right and make sure 'Welcome' is checked.)
When applications are open, your 'Recent News' will include a call to apply with a link to the application. Remember: sessions are limited to a certain number of participating classes so we can ensure that mentors are available to every student group. Apply early if you can to ensure your class will be included!
Step 4: Obtain administration approval
In order to ensure that PlantingScience's format is consistent with your school's policies, the PlantingScience staff may reach out to you and ask you to complete a School Authorization Form. This form is only required if:
- You are the first teacher to use PlantingScience in your school,
- PS Staff specifically requests you to complete it for internal record-keeping, or
- Your school administration has changed since the last time PlantingScience was used in your building.
The form is relatively simple and straightforward, but if your administration has questions, please have them reach out to us at psteam@plantingscience.org
Preparing your classroom
Step 1: Receive your Welcome packet
A few weeks before each session you will get an e-mail from psteam@plantingscience.org letting you know if you have been accepted for the session. Shortly after this notification, you will receive - depending on the Investigation Theme you've selected - materials needed to complete the investigation, as well as your PlantingScience t-shirt (if requested), and other welcome materials. First-time participants will also receive a copy of Inquiring About Plants.
The chart below displays what materials PlantingScience provides to teachers:
| Theme | Materials Provided |
|---|---|
| Agronomy Feeds the World* | Radish Seeds, grape Kool-aid packet |
| C-Fern in the Open | C-fern spores (sent via Carolina Biological Supply) |
| Celery Challenge | None |
| Foundations in Genetics (Brassica) | WFP F2 seeds (sent via Carolina Biological Supply) |
| Plant Get Sick, Too! | None |
| Pollen Investigations | None |
| The Power of Sunlight | Luer-lock syringes, radish seeds |
| The Wonder of Seeds* | Mix of dicot and monocot seeds |
| Tree-Mendous Benefits of Trees | None |
* - Those teachers who selected these Themes with the optional 'Corn Competition' add-on will receive corn seeds as well.
Step 2: Prepare other materials
Make sure to read through your Investigation Theme materials carefully before you begin. Many will require other materials besides those sent by PlantingScience. For the most part, these materials are easily obtained if needed, but certain materials - notably special growth media - may need to be ordered ahead of time.
In those cases where a specific vendor is preferred, this will be specified in your teacher handbook. If you have trouble locating materials you need, contact us at psteam@plantingscience.org and our staff will help you locate a vendor.
Step 3: COPPA compliance for Middle School teachers
In the United States, the Children's Online Privacy Protection Rule (aka 'COPPA') requires guardian permission for students ages 12 and under to participate in online forums in which any identifiable information may be conveyed. PlantingScience's platform is set up to protect student privacy, but groups may post photographs that could be considered identifying information. Given this, all students 12 and under must have a parental permission form on file to use the PlantingScience website.
Parental permission forms are provided for download. If you teach students who are 12 years of age or younger, please have their guardians complete and return copies of this form. To submit them to PlantingScience, please either scan the forms and e-mail them to psteam@plantingscience.org or mail them to:
PlantingScience Staff
c/o Botanical Society of America
4344 Shaw Blvd.
St. Louis, Missouri 63110
Step 4: Organize your classes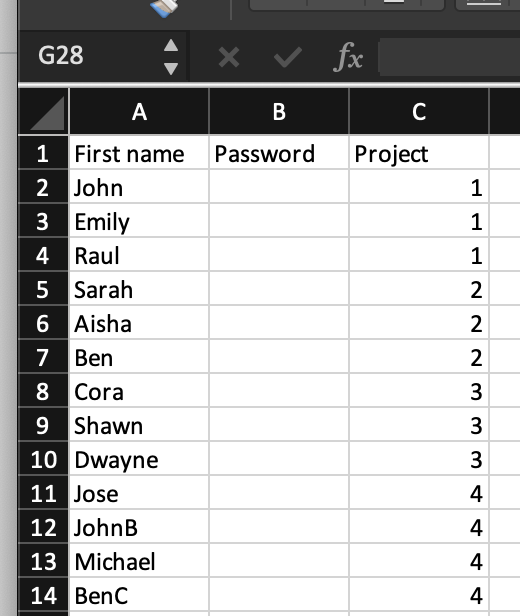
Students take part in PlantingScience as members of a team. Each team should include approximately 3-5 students who will work together to design and carry out their investigations. Having your teams established ahead of time will make setting up your class' online platform much easier.
You will be prompted to upload a simple .csv file of your teams when you set up your group's projects. (Click here to download a template.) The template will prompt you for students' first names only (you may add last initials if needed to distinguish students with the same first name), and the number of their project team.
You may specify a password if you prefer. Leaving this column blank will assign the same password to all students, which they can change after they log in for the first time.
Setting up your online Group page
Step 1: Exp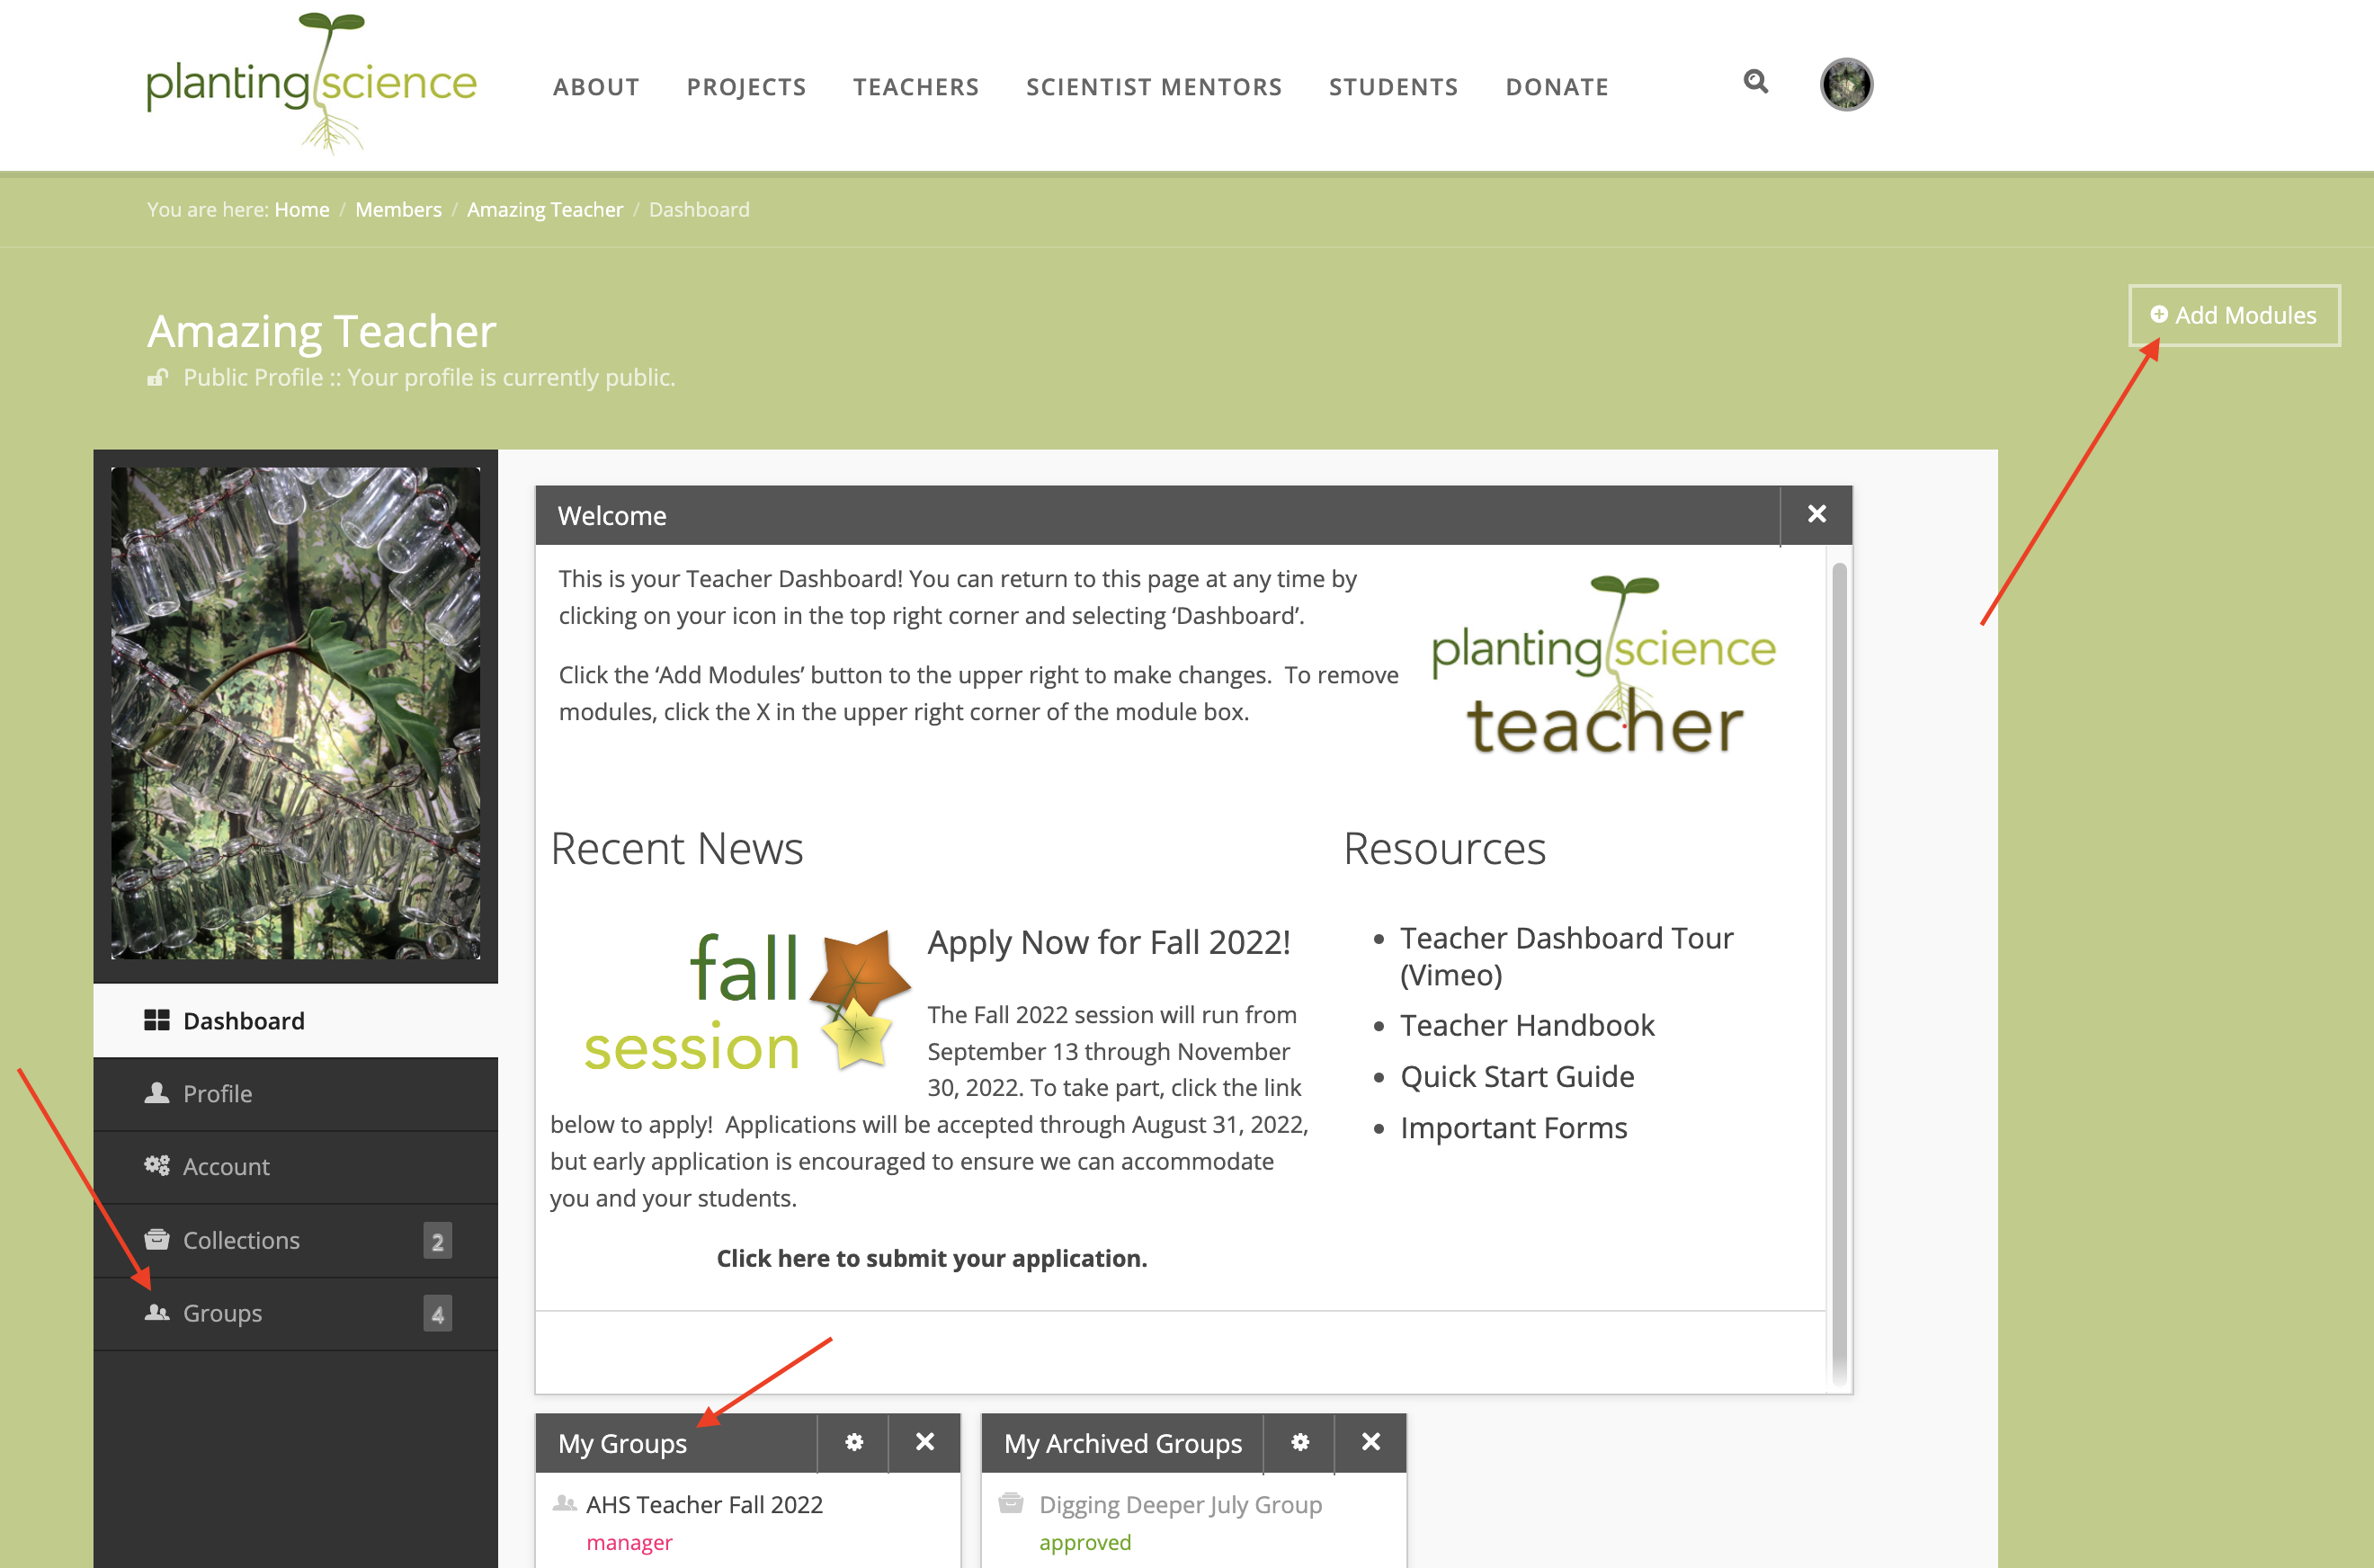 lore your Group(s)
You will be notified by PlantingScience staff when your group page(s) have been created for you. A group page is created for each Investigation Theme you will be using during the session, regardless of how many classes and students will be using that theme.
When you log into the PlantingScience website, you can find your active groups by either clicking on the 'Groups' option in the left-hand menu, or by checking your 'My Groups' module on the main pane of the dashboard. (If you do not see your 'My Groups' module, click 'Add modules' in the upper right and make sure 'My Groups' is checked.)
When you click on the name of the group, you'll call up that group's main page. This page is only visible to you and the scientists who will be working with your students. Students cannot see this page.
The following video provides a quick tour of the Group page:
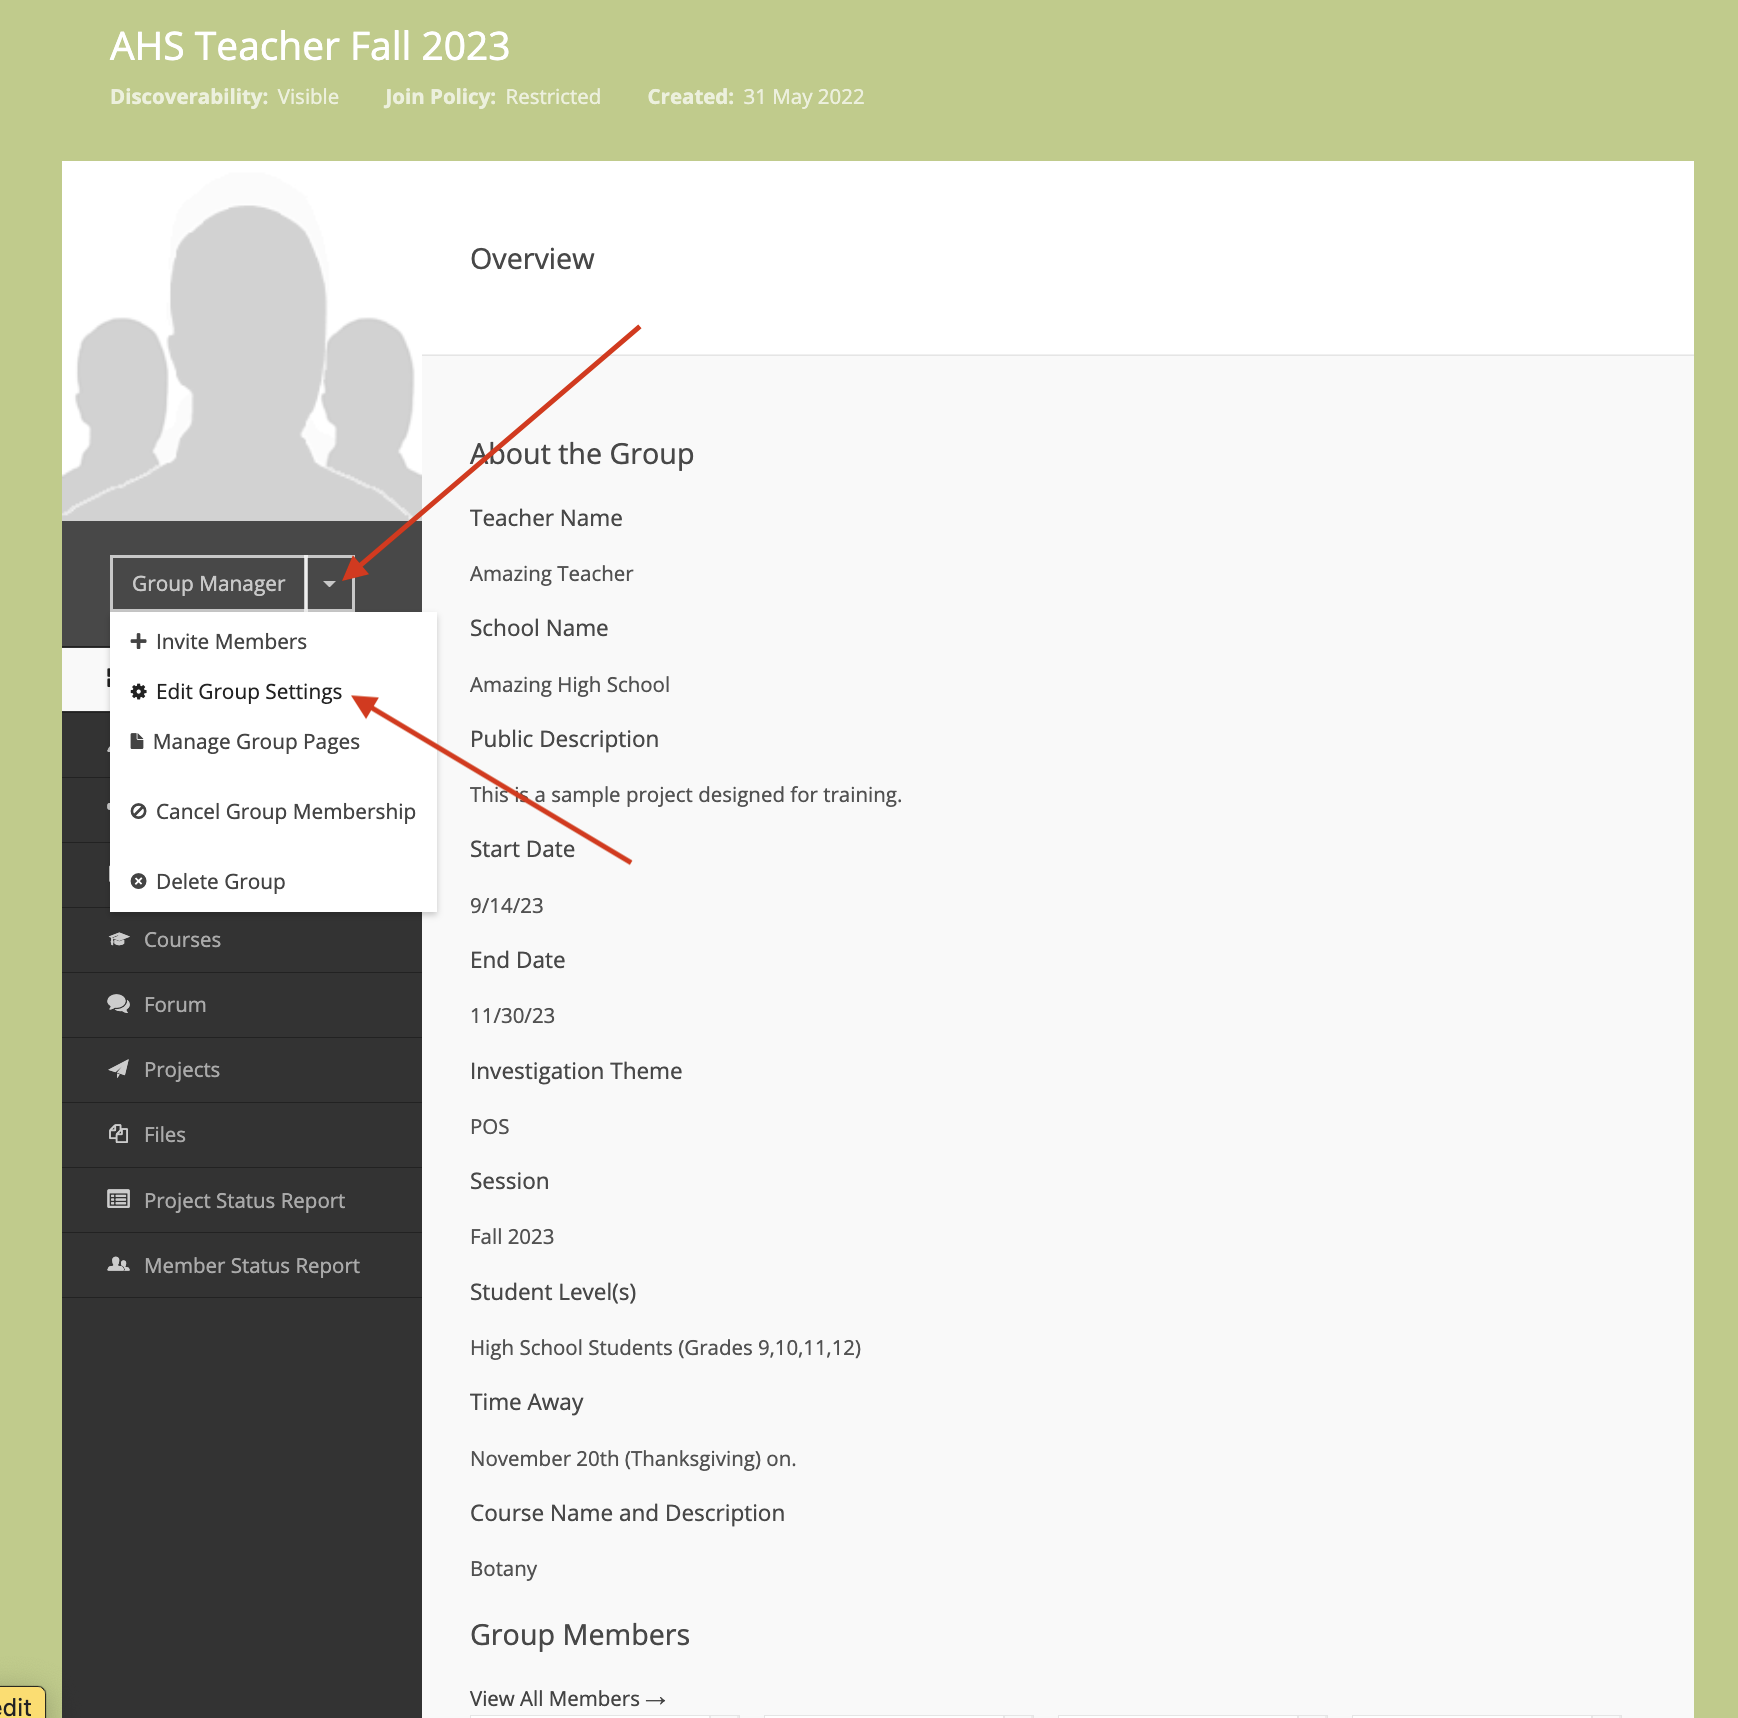
Step 2: Customize your Group page
You can edit the information here by clicking on the dropdown box next to 'Group Manager' and selecting 'Edit Group Settings' from the menu that appears.
Please note that changing settings on your group only affects what is shown in the Group page. Please do not change any setting that is not listed below, as doing so may cause confusion.
Please do update the following as appropriate:
- Your Public Description, which you can use to describe your class to the scientists working with you.
(Note that 'Private Description' can be skipped.) - Your Outcomes, if there are specific targets you want mentors to emphasize as they respond to students.
- Your Start and End dates, if they have changed for any reason.
- Your 'Time Away' dates if you know your class will be out of the classroom for breaks, class trips, etc.
- Your Class Meeting Time(s) and Day(s), as this helps mentors know when to expect students to be posting so they can prioritize check-ins accordingly.
- Your Course Name and Description if you want to provide more context for your course.
- Your students' Science Background and Language Skills, if you have students with specific support needs, such as gifted-level instruction, reading support, English as an additional language, etc.
- Your group's Logo, to personalize the page a bit.
If you make any changes, make sure to scroll to the very bottom and click 'Save Group'.
 Step 3: Create Project Teams
This step can be done before or after you invite your mentors (see below under 'Interacting with Scientists'). If mentors have joined your group already, you can add them to teams during the creation process. If not, you can go back in and add them later.
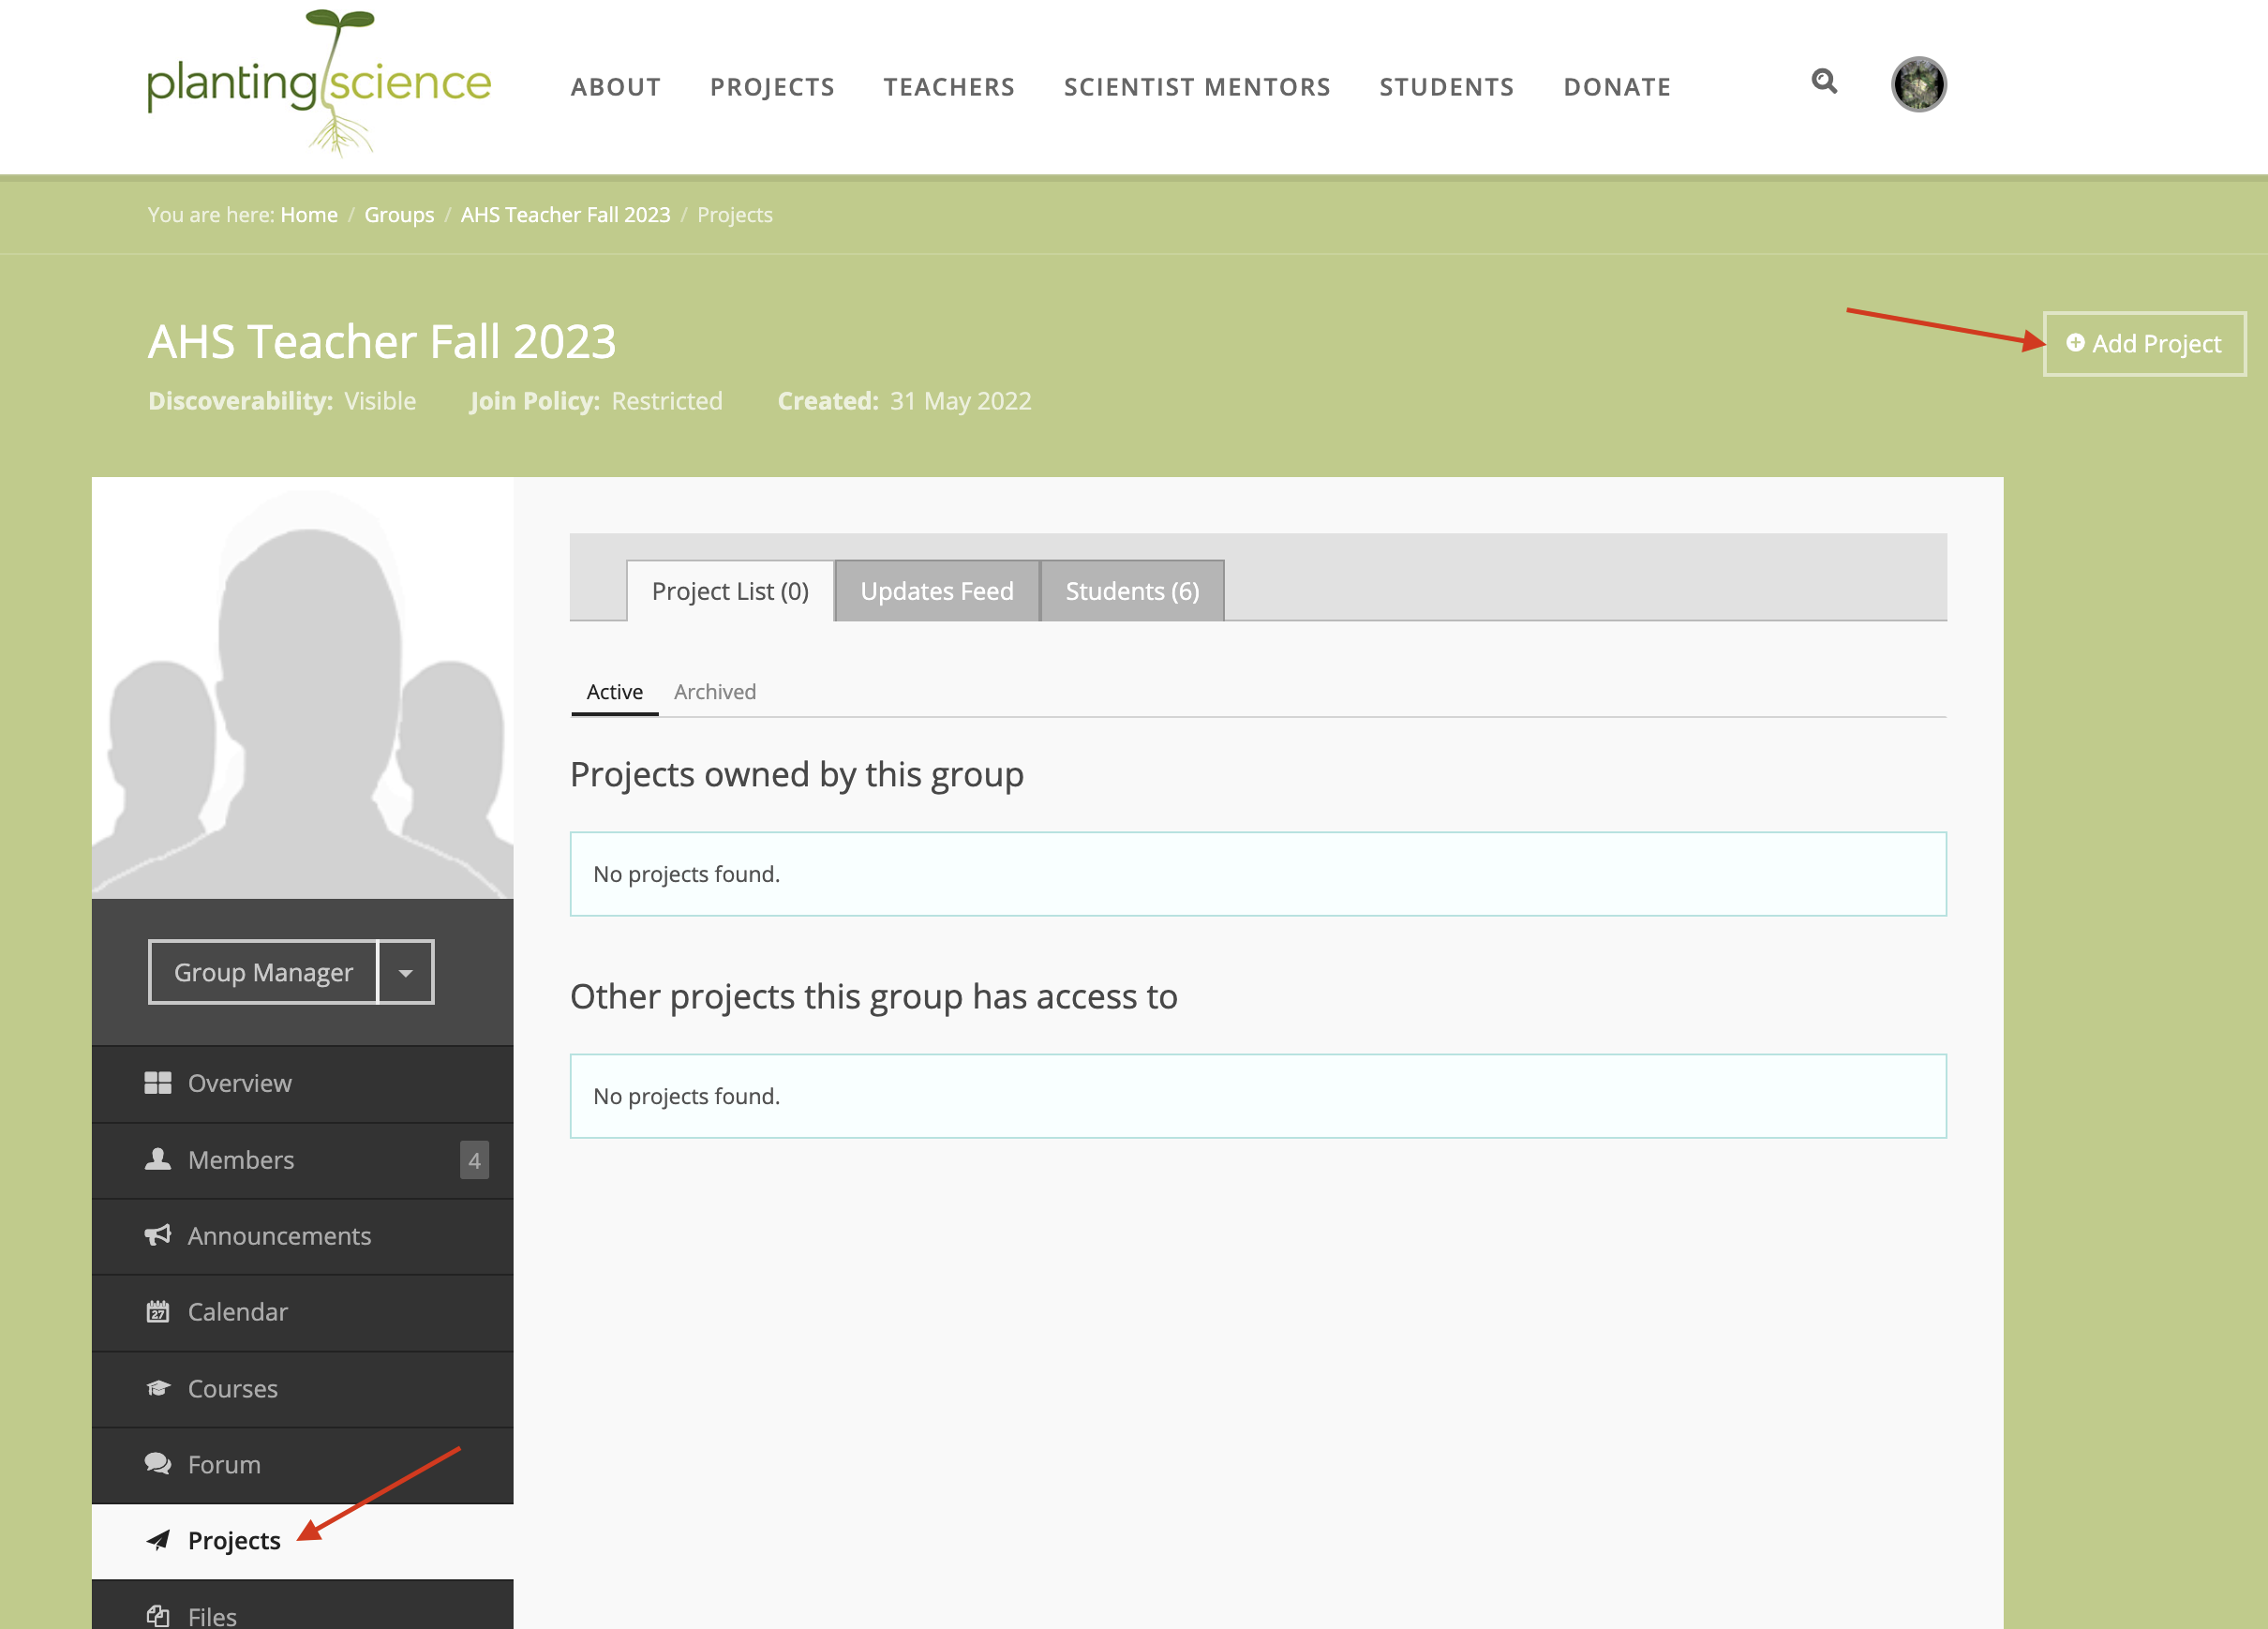
From your Group page, look for 'Projects' in the left-hand column. This will open your Projects page, which should look like the image to the right.
To create your projects, click on the 'Add Project' button in the upper right hand corner of your screen.
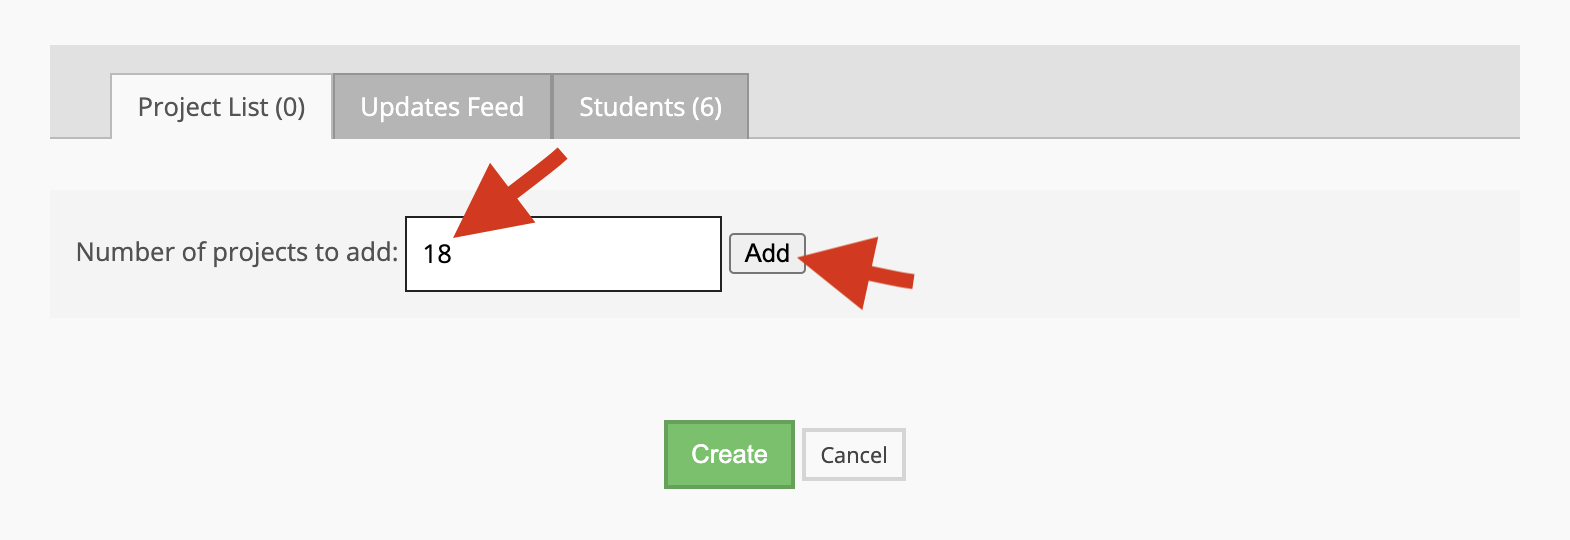
This will open the Project Creation screen. Simply enter the total number of teams needed to accommodate students in all classes using this module, then click 'Add' to create project drafts (not the 'Create' button).
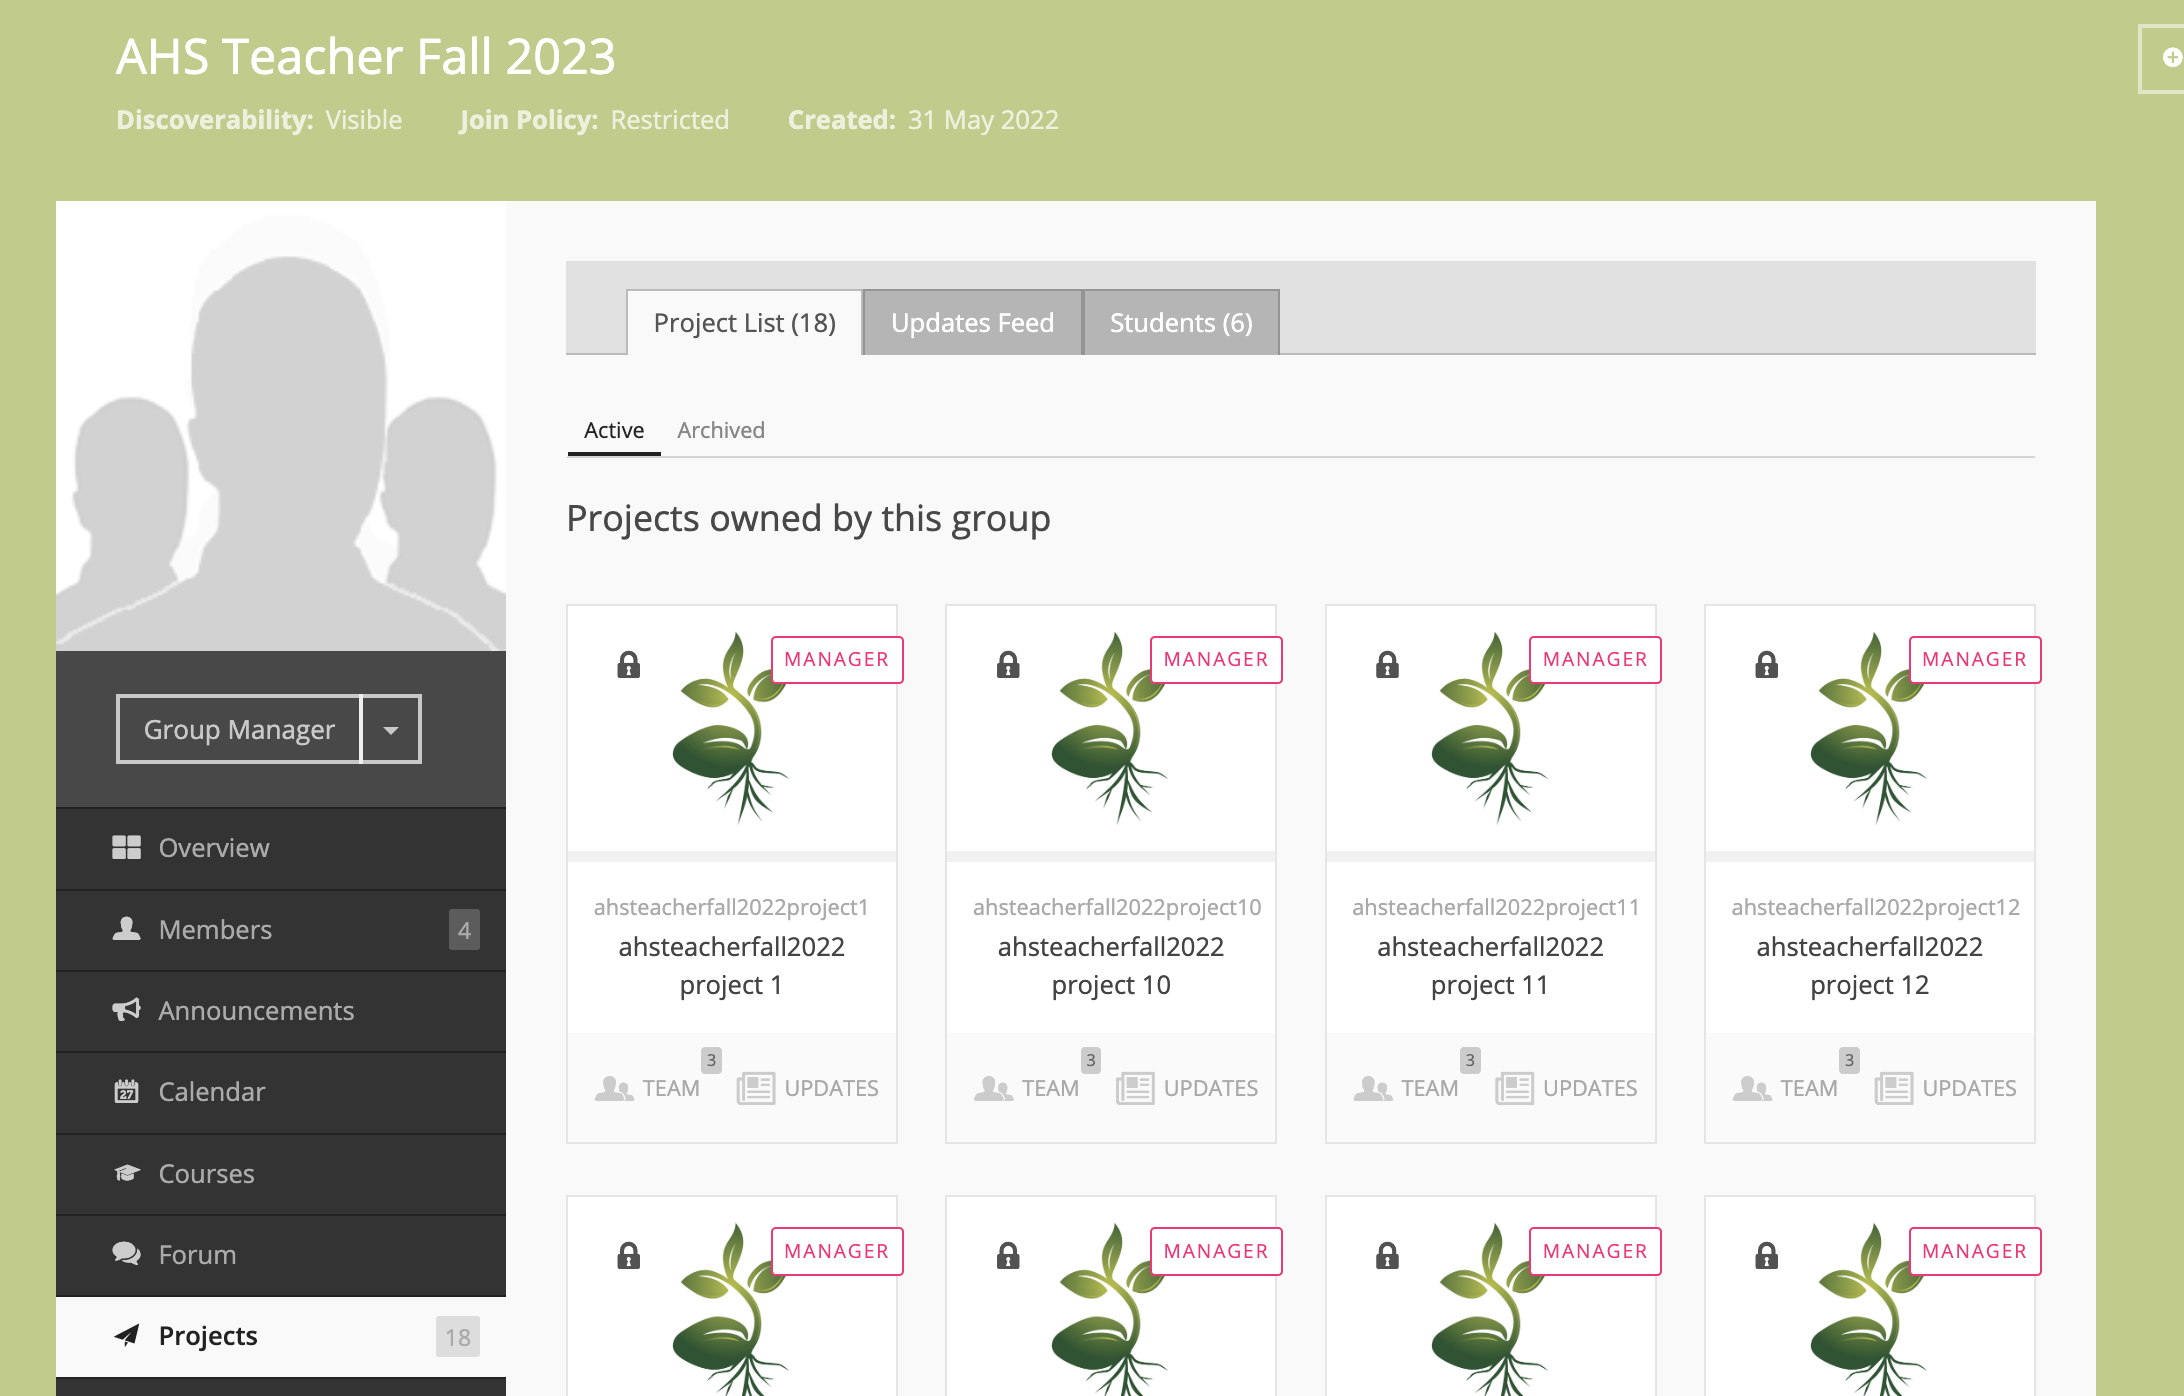
The drafted projects will appear as follows, in numerical order with the alias and teacher, staff, and liaison roles assigned based on your group's existing setup:

If scientist mentors have already joined your group, you can assign them to the groups by clicking on the '-Team Member-' dropdown and selecting the mentor you want to work with teach team. If you haven't recruited scientist mentors yet, don't worry - you can add them after the projects are created.
 When any role assignments have been completed, click the green 'Create' button.
You will be taken to the Projects page with the newly-created projects. Each should have a red 'Manager' banner, indicating that as a teacher you have manager-level permissions.
As a manager, you can access and edit the project name if you wish. (You cannot change the project's alias, however.) Some teachers allow students to name their project groups, and others choose to assign names that make tracking the groups belonging to different classes easier.
Interacting with Scientists
This step can be done by teachers or liaisons.
- 1) Filter the mentor gallery by availability, class level, and investigation theme to choose appropriate scientist mentors for your teams. It’s a good idea to have several backup choices in mind.
- 2) Invite selected mentors to join your classroom group using the Members tab in your classroom group, and the “invite members” button at the top right.
9. Invite 2nd Round of Mentors
Are you having trouble with the auto-selected mentors in your group - not enough? Too many? Wrong qualifications?
This step can be done by teachers or liaisons.
Sometimes it takes more than one round of invitations to get all the mentors that you need. Try to plan at least 6 days for mentor matching. Keep track of when you have sent invitation(s) so that you can cancel hanging invitations and invite someone new after 3 days.
10. Welcome Mentors and Share Timeline
This step can be done by teachers or liaisons.
Once enough mentors have joined your group, it is a good idea to welcome them and provide an update on what the class is doing to in class, and send out an announcement about when you plan to make team assignments and when the students will be logging on for the first time.
What options do I have for communicating with mentors in my classroom group?
11. Create Team Projects
This step can be done by teachers or liaisons.
Each of your teams will get their own project page to work on. To create projects:
- Click on the “Projects” tab in your classroom group. Click “Add Project” button at the top right.
- Enter the number of projects you will need and click “Add.” This will create a project for each team.
- You can use the “team member” dropdown to add a mentor to each team at this stage if you’d like. Only mentors who have accepted group membership will show up here. The role should remain “collaborator.”
- Click “create” button at the bottom.
12. Assign one Mentor to Each Project
This step can be done by teachers or liaisons.
You can add a mentor to each project AS you create projects (see previous step). After you have created projects, you can add mentors by:
- Clicking on the “team” icon at the bottom of each project “card” in your project list.
- Click on the “edit team” button at the top right.
- Using the “Add new member(s)” box to enter the mentor’s name. Mentors should be “collaborators.”
13. Add Students to Projects
This step should be done by teachers.
Student accounts are created in the “projects” tab of your classroom group on the “students” horizontal tab. Click “create” to get started.
For this step you need to know:
Passwords MUST contain:
- The first name of your students (can include last initial or other identifiers if you have several students with the same first name)
- The password you’d like students to use the first time they log in (we recommend using the same password for all students…they will change it when they log in and you can reset it if they forget).
- at least 1 letter
- at least 8 characters
- no more than 16 characters
- more than 4 unique characters
- no easily-guessed words
- The project number (1,2,3 etc) of the project each student will be on.
Student accounts can be created one at a time or you can download and complete a .csv template and create all the student accounts at once. Only enter students’ first names, password (it can be the same for all students), and a number for the project team to which the student will be assigned.
Click for a step-by-step to create student accounts one at a time.
14. Hand out Tickets
This step should be done by teachers, and tickets SHOULD ONLY go to students who have turned in completed consent forms (13 and under).
You can download a .pdf of “tickets” that you can cut up and hand out to your students when it is time for them to log in for the first time.
Click for a step-by-step with screenshots.
How do I reset a password for a student?
- Click on the “projects” tab within your classroom group and click on the “Students” horizontal tab.
- Click on the dropdown “Export” button at the top right and choose “PDF.”
- Print this file, cut into “tickets” and hand out to your students. Recommend that they write down their PlantingScience username and the password they choose in their lab notebook or somewhere else where they are unlikely to forget it.
15. Bring Students Online
Direct students to the student guide for a step-by-step guide to getting started with their projects. Having a few print copies of this on hand is also helpful.
It can be helpful to give students some guidance for introducing themselves to mentors. Some teachers give prompts or a quick reminder about professional communication. It is a good idea to ask mentors to introduce themselves before students come online to set the tone for the conversation.
Tips for teachers about facilitating online conversations with mentors
16. Project Planning with Mentors: More time = Better Projects
Make sure to leave plenty of time for project planning with mentors before your students need to begin their investigations. This is a critical time for mentor input and you’ll want to leave enough time for several exchanges between your students and their mentors. More time here almost always leads to better investigations. Make sure your students are taking their mentors’ feedback into consideration!
17. Missing Mentors: Get Help from your Liaison
Occasionally, a mentor will not come online or will come online but then suddenly stop contributing to a conversation.
Teachers: let your liaison know if you notice particular teams need immediate feedback. The liaison will step in to mentor temporarily and report the missing mentor to program staff so that we can work to get them back online.
18. Investigations Begin
Be sure to let your mentors know when you expect students will carry out their investigations in class. This will help the mentors to time when they should provide their feedback. Sometimes students post less frequently during the data collection phase of their experiment. You can encourage them to stay in touch with their mentor. If they do not have new data to report, they can always ask questions about their scientist’s work or life.
Liaisons, you can help facilitate discussions at this point. Often you will find that you will need to answer mentor questions about the timeline in the group forum, facilitate communication between the teacher and mentor - depending on how active the teacher is online - and provide periodic encouragement to mentors throughout the process. Remember, as a liaison, you can see a broader picture than mentors, who can sometimes feel a little lost without specific instructions or interactions from liaisons, teachers, and students. If you are not sure, be sure to check in with your teacher partner so you can help.
19. Videoconference Motivation Boost
If you have a good internet connection and webcam, consider working with your IT department and your liaison to plan a videoconference with your scientist mentors. You can use Skype, Zoom, Google Hangouts or other platforms. Get in touch with psteam@plantingscience.org for help. Teachers have arranged videoconferences at many stages of their students’ investigations, either towards the beginning where students get feedback on their proposals and/or get to ask scientists about their lives, or toward the end where students present their work and get final feedback about their conclusions and presentations. Typically, it is best to choose 2-3 mentors who are available for a videoconference with the whole class as more on a call can slow down the connection speed.
IMPORTANT NOTE: Please do not schedule videoconferences unless the teacher will be present on each call. It is against our policies to have unsupervised conversations between students and scientists.
20.Making Meaning with Mentors: More time = Better projects
After the investigations are complete is another critical point for students to communicate with their mentors. Mentors can help the students make meaning of their data and interpret their results to make better conclusions. Mentors can also help student teams put together better ways to communicate their results. More time spent in this phase almost always leads to better projects.
21. Thanks and Goodbye
It makes a lot of difference to our volunteer mentors if teachers or students take a moment at the end of the project to share something they’ve learned or something they are still curious about, and to thank the mentors for their help.
Please be sure to let the mentors know when the students have finished and will no longer be logging on to the website so that they know they do not need to keep checking for updates.
Thank you, teachers and liaisons, for helping to open students’ eyes to the importance of plants and science. Please come back and join us for a future session!
22. Loved it? Apply for Next Session
If you have enjoyed this session of PlantingScience, please consider joining us again in a future session! We will be in touch with a reminder before each session. Or, you can apply for an upcoming session here.